- Related issues: #5846 [ENHANCEMENT] vm-import-controller enhancements
Category:
- Virtual Machine
OpenStack Prerequisite Setup
- Prepare a baremetal or virtual machine to host the OpenStack service
- Or use the automated Jenkins pipeline to prepare a devstack cluster (Openstack 16.2) (stable/train)
- Install OpenStack command line tool on your local machine (introduce in next section)
VMware vSphere Prerequisite Setup
- Get the available access to the existing or prepared vSphere client (v7.1)
Harvester Prerequisite Setup
- Harvester can connect to the OpenStack dashboard and API endpoint
- Harvester can connect to the vSphere client dashboard and API endpoint
- Enable the
vm-import-controllerin theAddonspage - Create the
vlan1vm network on themgmtinterface
Install OpenStack command line tool
- Require python 3.10 or you can use virtual environment (venv)
virtualenv venv --python=python3.10
source venv/bin/activate
- Install OpenStack client
pip install python-openstackclient
- Download the OpenStack cloud.yaml file
- Access the openstack dashboard
- Open
API Accesspage - Click the
Download OpenStack RC Filebutton - Select the
OpenStack cloud.yaml File
- Copy the cloud.yaml file to your openstack config folder
mkdir -p ~/.config/openstack
cp -v ~/Documents/Harvester/Openstack/clouds.yaml ~/.config/openstack
- Check can list the image list on OpenStack Server
openstack image list --os-auth-url <openstack URL>/identity --os-identity-api-version 3 --os-project-name admin --os-project-domain-name default --os-username <username> --os-password <password>
VmwareSource Verification Steps
Setup VmwareSource secret and object
-
Access Harvester node and change to root
-
Define and create a secret for your vmware cluster
apiVersion: v1 kind: Secret metadata: name: vsphere-credentials namespace: default stringData: "username": "user" "password": "password" -
Define and create a VmwareSource Object
apiVersion: migration.harvesterhci.io/v1beta1 kind: VmwareSource metadata: name: vcsim namespace: default spec: endpoint: "<vSphere client URL>/sdk" dc: "Datacenter" credentials: name: vsphere-credentials namespace: default -
Check the VMwareSource Cluster is Ready
harvester-node-0:~ # kubectl get vmwaresource.migration NAME STATUS vcsim clusterReady -
If failed to connect to the VMwareSource object, check the following
- Use IP address instead of dns name (Use nslookup command)
- Check the datacenter value
- Check the username and password
Verify WMware EFI Based VM with secure boot migration
- Access the vSphere Client
- Right Click on the Cluster compute source -> New Virtual Machine
- You can create a new virtual machine or clone an existing one
- Select an available storage
- Finish the rest option
- After VM created, edit the settings
- Select VM Options and expand Boot Options
- Select Firmware to
EFI(recommended) - Select
Secure Bootoption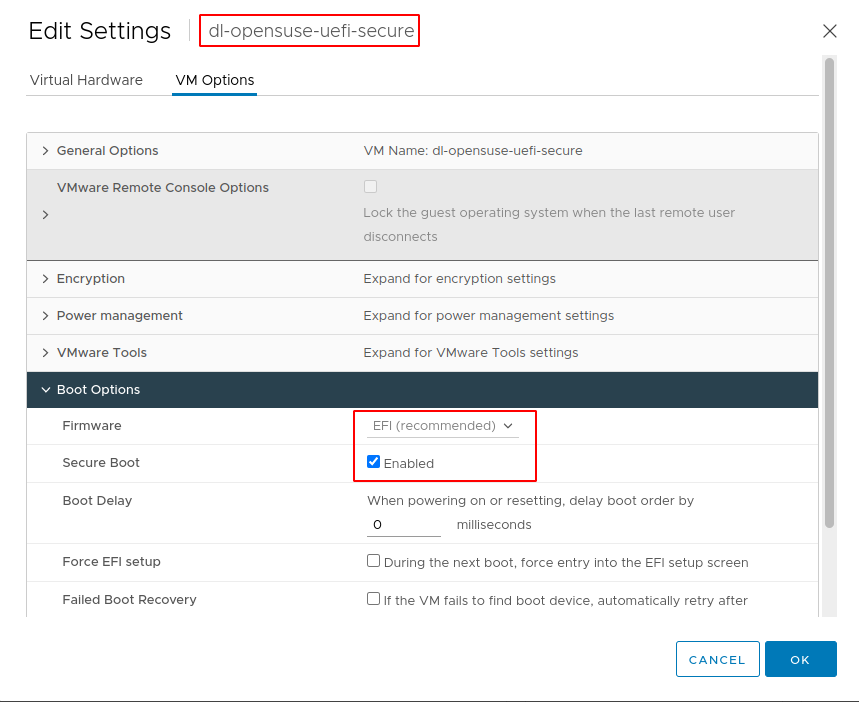
- Save and ensure VM start in running state
- Access to Harvester node and change to root
- Create the yaml file content for the VMware VirtualMachineImport object
apiVersion: migration.harvesterhci.io/v1beta1
kind: VirtualMachineImport
metadata:
  name: vcsim-uefi-sec
  namespace: default
spec:
  virtualMachineName: "dl-opensuse-uefi-secure"
  networkMapping:
  - sourceNetwork: VM Network
    destinationNetwork: "default/vlan1"
  sourceCluster:
    name: vcsim
    namespace: default
    kind: VmwareSource
    apiVersion: migration.harvesterhci.io/v1beta1
- Wait for the vm-import-controller to start image transfer and create virtual machine
Expected Result
- Can import UEFI mode with secure boot VM from VMware to Harvester
- The imported VM started in running state
- Check the config of imported VM
- In the
Advanced Optionspage, checkBooting in EFI modeandSecure Bootare both selected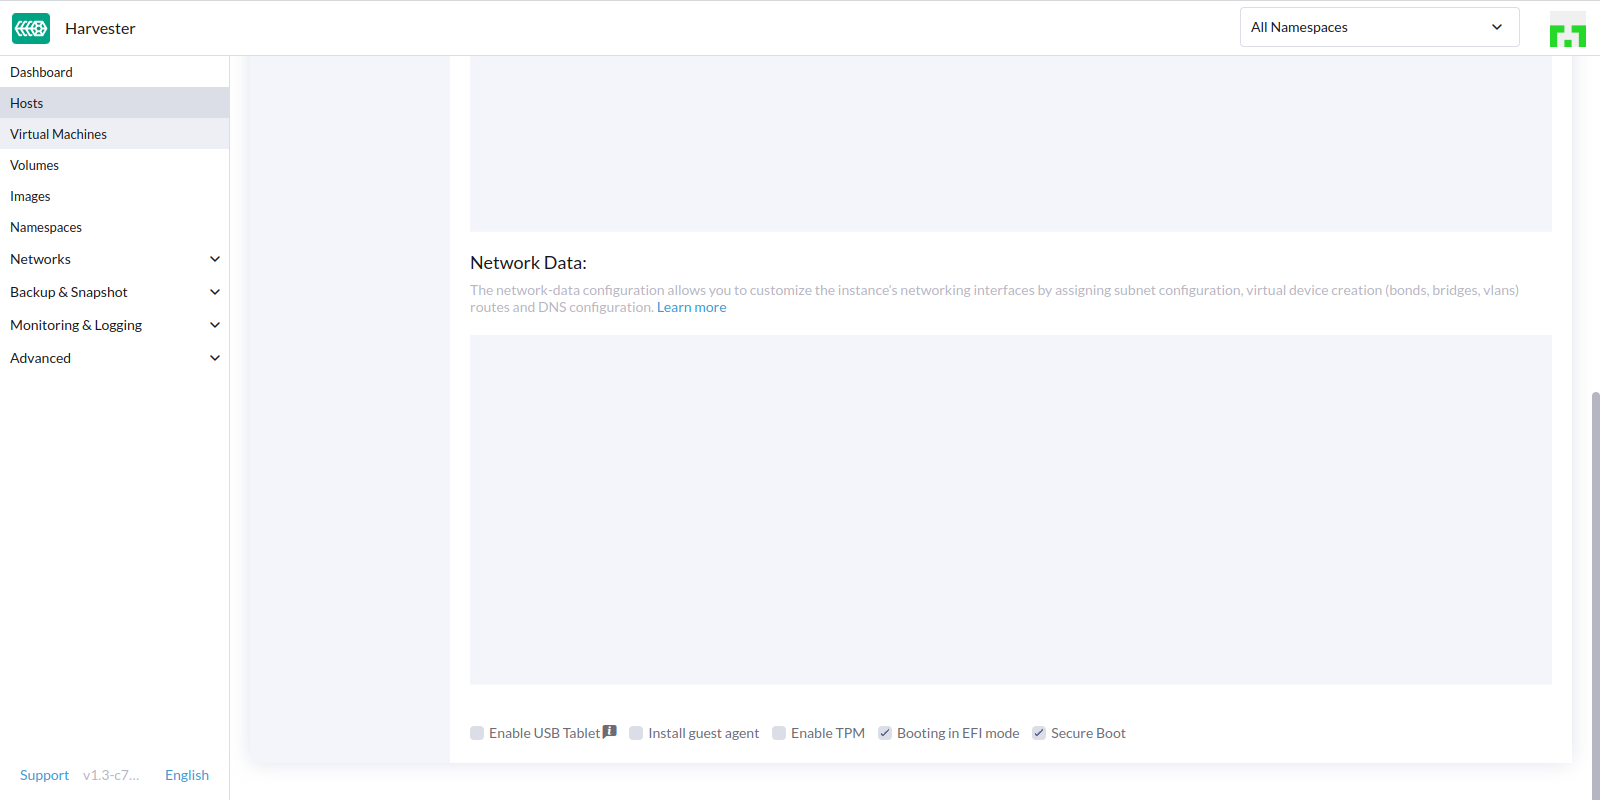
Verify WMware EFI Based VM migration
- Access the vSphere Client
- Right Click on the Cluster compute source -> New Virtual Machine
- You can create a new virtual machine or clone an existing one
- Select an available storage
- Finish the rest option
- After VM created, edit the settings
- Select VM Options and expand Boot Options
- Select Firmware to
EFI(recommended)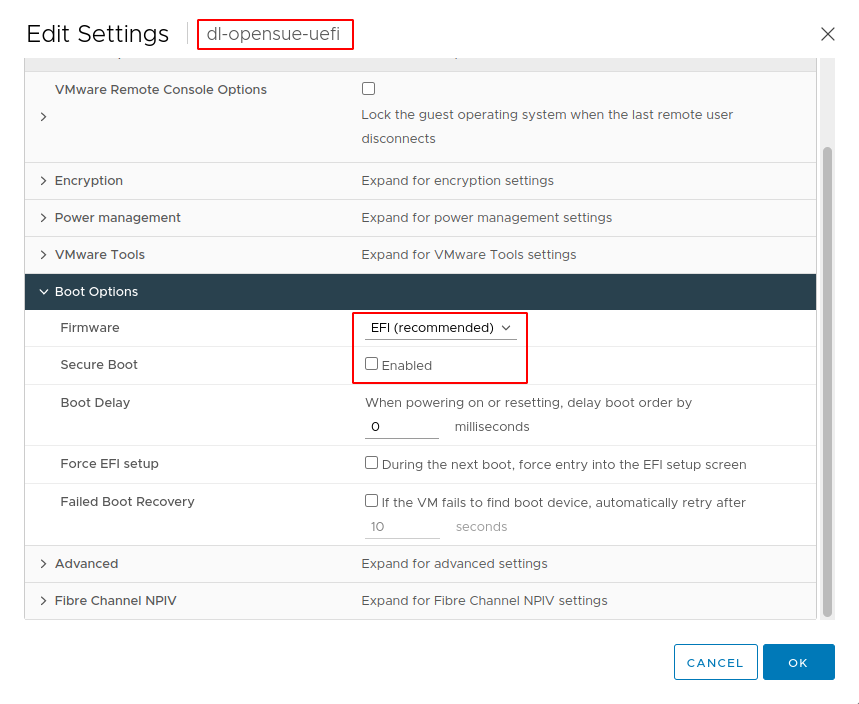
- Save and ensure VM start in running state
- Access to Harvester node and change to root
- Create the yaml file content for the VMware VirtualMachineImport object
apiVersion: migration.harvesterhci.io/v1beta1
kind: VirtualMachineImport
metadata:
  name: vcsim-uefi
  namespace: default
spec:
  virtualMachineName: "dl-opensue-uefi"
  networkMapping:
  - sourceNetwork: VM Network
    destinationNetwork: "default/vlan1"
  sourceCluster:
    name: vcsim
    namespace: default
    kind: VmwareSource
    apiVersion: migration.harvesterhci.io/v1beta1
- Wait for the vm-import-controller to start image transfer and create virtual machine
Expected Result
- Can import UEFI mode VM from VMware to Harvester
- The imported VM started in running state
- Check the config of imported VM
- In the
Advanced Optionspage, check only theBooting in EFI modebe selected
Verify VMware BIOS based VM migration
- Access the vSphere Client
- Right Click on the Cluster compute source -> New Virtual Machine
- You can create a new virtual machine or clone an existing one
- Select an available storage
- Finish the rest option
- After VM created, edit the settings
- Select VM Options and expand Boot Options
- Select Firmware to
BIOS(recommended)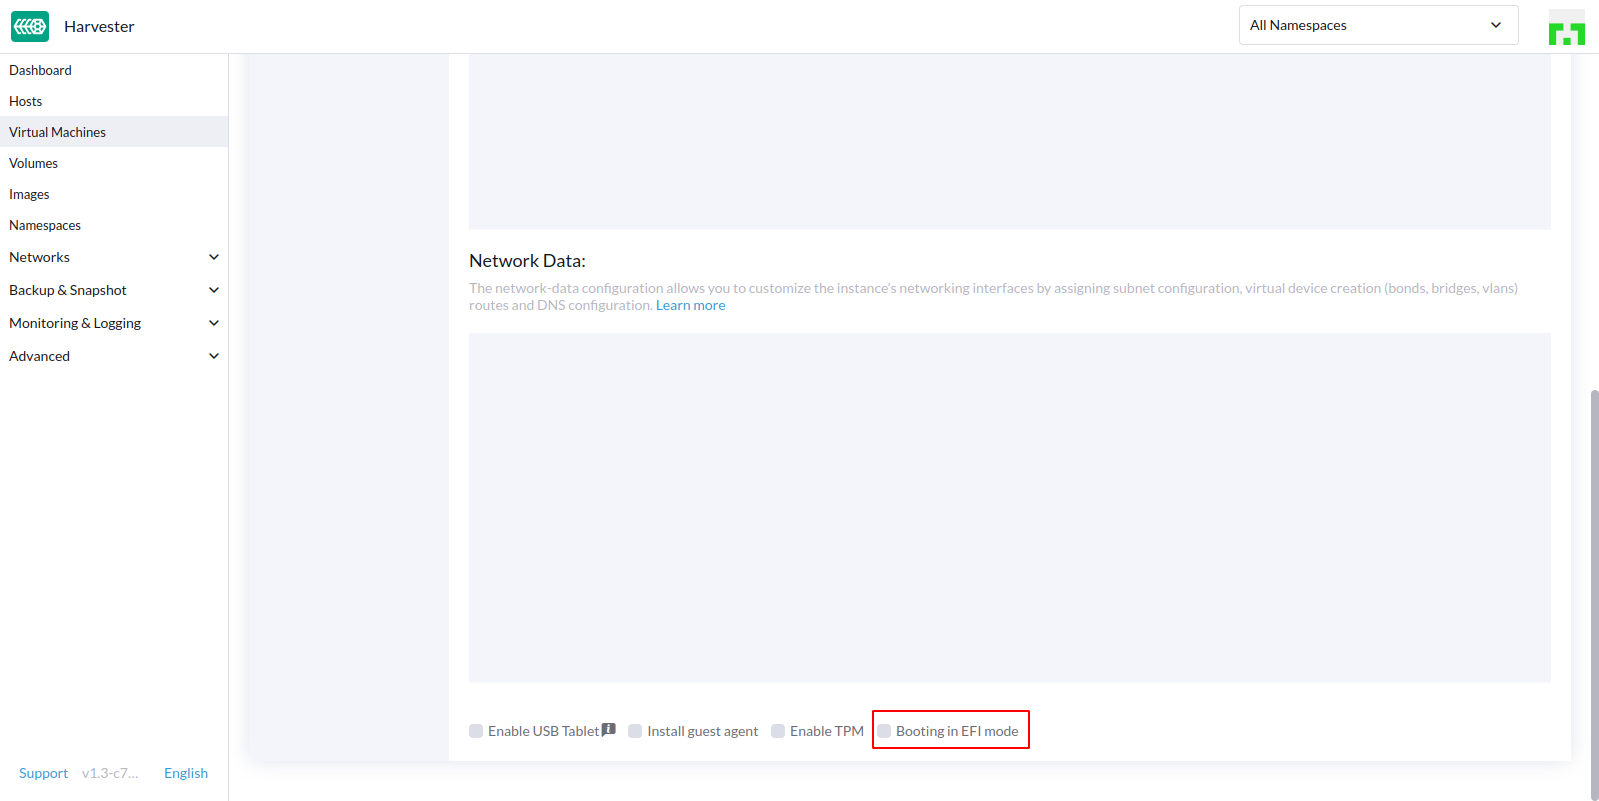
- Save and ensure VM start in running state
- Access to Harvester node and change to root
- Create the yaml file content for the VMware VirtualMachineImport object
apiVersion: migration.harvesterhci.io/v1beta1
kind: VirtualMachineImport
metadata:
  name: vcsim-bios
  namespace: default
spec:
  virtualMachineName: "dl-ubuntu-bios"
  networkMapping:
  - sourceNetwork: VM Network
    destinationNetwork: "default/vlan1"
  sourceCluster:
    name: vcsim
    namespace: default
    kind: VmwareSource
    apiVersion: migration.harvesterhci.io/v1beta1
- Wait for the vm-import-controller to start image transfer and create virtual machine
Expected Result
- Can import BIOS mode VM from VMware to Harvester
- The imported VM started in running state
- Check the config of imported VM
- In the
Advanced Optionspage, check only theBooting in EFI modeisnot selected

Verify WMware EFI based VM migration using a custom storage class
- Access to Harvester dashboard
- Open the Storage Classes page
- Create a new storage class named
single-replica - Given “Number Of Replicas” value to
1 - Access the vSphere Client
- Right Click on the Cluster compute source -> New Virtual Machine
- You can create a new virtual machine or clone an existing one
- Select an available storage
- Finish the rest option
- After VM created, edit the settings
- Select VM Options and expand Boot Options
- Select Firmware to
EFI(recommended) - Save and ensure VM start in running state
- Access to Harvester node and change to root
- Create the yaml file content for the VMware VirtualMachineImport object
- Given the storageClass value to
single-replica
apiVersion: migration.harvesterhci.io/v1beta1
kind: VirtualMachineImport
metadata:
  name: vmw-uefi-storage
  namespace: default
spec:
  virtualMachineName: "dl-uefi-storage"
  storageClass: single-replica
  networkMapping:
  - sourceNetwork: VM Network
    destinationNetwork: "default/vlan1"
  sourceCluster:
    name: vcsim
    namespace: default
    kind: VmwareSource
    apiVersion: migration.harvesterhci.io/v1beta1
- Wait for the vm-import-controller to start image transfer and create virtual machine
Expected Result
- Can import EFI mode VM from VMware to Harvester
- The imported VM started in running state
- Check the imported VM
imageuse the specificsingle replicastorage class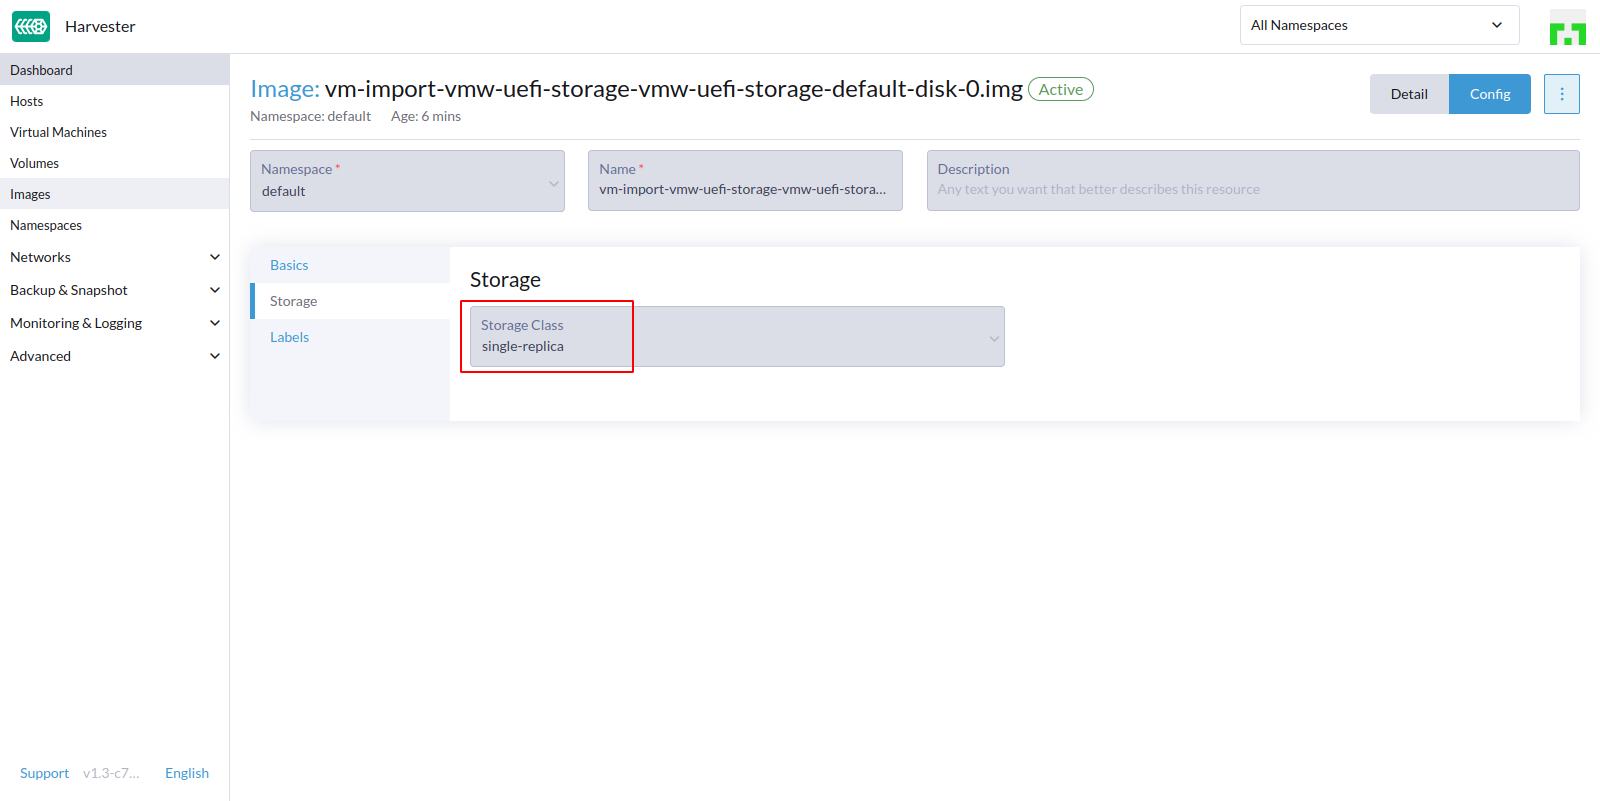
- Check the imported VM
volumeuse the specific “single replica” storage class
OpenstackSource Verification Steps
Verify OpenStack EFI Based VM with secure boot migration
- Access the OpenStack dashboard
- Open images page -> Create image
- Upload a brand new image from
Image Sourceand select theFormat - Wait for the image upload complete
- Use OpenStack CLI tool to check all available image list
openstack image list --os-auth-url <openstack dashboard url>/identity --os-identity-api-version 3 --os-project-name admin --os-project-domain-name default --os-username <username> --os-password <password>
- You can find all available image list with ID
+--------------------------------------+--------------------------+--------+
| ID                                   | Name                     | Status |
+--------------------------------------+--------------------------+--------+
| 9ba4963e-f412-409d-81a7-05ce6ae39301 | cirros-0.4.0-x86_64-disk | active |
| fa3ab60f-32b0-4f69-aba3-e35a9970b096 | openSUSE-Leap-15.4       | active |
| 702b597f-dc2a-4f5e-b879-e7ae99642978 | ubuntu-focal-20.04       | active |
+--------------------------------------+--------------------------+--------+
- Select the image ID that you want it to become
UEFI modeandSecure boot - Use OpenStack CLI tool to set the image to required boot options and machine type
openstack image set --property hw_firmware_type=uefi --property os_secure_boot=required fa3ab60f-32b0-4f69-aba3-e35a9970b096 --os-auth-url <openstack dashboard URL>/identity --os-identity-api-version 3 --os-project-name admin --os-project-domain-name default --os-username <username> --os-password <password>
-
Back to the OpenStack dashboard
-
Open the Images page, select the image you set with openstack CLI and click
Launch -
Given the
Instance name,FlavorandNetworkto create a new vm -
Ensure the VM is running well on the OpenStack Instance page
-
Access to Harvester node and change to root
-
Create the yaml file content for the OpenStack VirtualMachineImport object
apiVersion: migration.harvesterhci.io/v1beta1
kind: VirtualMachineImport
metadata:
  name: uefi-secure
  namespace: default
spec:
  virtualMachineName: "<instance name>" #Name or UUID for instance
  networkMapping:
  - sourceNetwork: "external"
    destinationNetwork: "default/vlan1"
  sourceCluster:
    name: microstack
    namespace: default
    kind: OpenstackSource
    apiVersion: migration.harvesterhci.io/v1beta1
- Wait for the vm-import-controller to start image transfer and create virtual machine
Expected Result
- Can import UEFI mode with secure boot VM from VMware to Harvester
- The imported VM started in running state
- Check the config of imported VM
- In the
Advanced Optionspage, checkBooting in EFI modeandSecure Bootare both selected
Verify OpenStack EFI Based VM migration
- Access the OpenStack dashboard
- Open images page -> Create image
- Upload a brand new image from
Image Sourceand select theFormat - Wait for the image upload complete
- Use OpenStack CLI tool to check all available image list
openstack image list --os-auth-url <openstack dashboard url>/identity --os-identity-api-version 3 --os-project-name admin --os-project-domain-name default --os-username <username> --os-password <password>
- You can find all available image list with ID
- Select the image ID that you want it to become
UEFI modeonly - Use OpenStack CLI tool to set the image to required boot options and machine type
openstack image set --property hw_firmware_type=uefi <image-id> --os-auth-url <openstack url>/identity --os-identity-api-version 3 --os-project-name admin --os-project-domain-name default --os-username <username> --os-password <password>
-
Back to the OpenStack dashboard
-
Open the Images page, select the image you set with openstack CLI and click
Launch -
Given the
Instance name,FlavorandNetworkto create a new vm -
Ensure the VM is running well on the OpenStack Instance page
-
Access to Harvester node and change to root
-
Create the yaml file content for the OpenStack VirtualMachineImport object
apiVersion: migration.harvesterhci.io/v1beta1
kind: VirtualMachineImport
metadata:
  name: uefi
  namespace: default
spec:
  virtualMachineName: "<instance name>" #Name or UUID for instance
  networkMapping:
  - sourceNetwork: "external"
    destinationNetwork: "default/vlan1"
  sourceCluster:
    name: microstack
    namespace: default
    kind: OpenstackSource
    apiVersion: migration.harvesterhci.io/v1beta1
- Wait for the vm-import-controller to start image transfer and create virtual machine
Expected Result
- Can import UEFI mode VM from VMware to Harvester
- The imported VM started in running state
- Check the config of imported VM
- In the
Advanced Optionspage, check only theBooting in EFI modebe selected
Verify OpenStack BIOS based VM migration
-
Access the OpenStack dashboard
-
Open images page -> Create image
-
Upload a brand new image from
Image Sourceand select theFormat -
Wait for the image upload complete
-
The default image boot mode is BIOS type, we don’t need to run the openstack CLI tool
-
Back to the OpenStack dashboard
-
Open the Images page, select the image you set with openstack CLI and click
Launch -
Given the
Instance name,FlavorandNetworkto create a new vm -
Ensure the VM is running well on the OpenStack Instance page
-
Access to Harvester node and change to root
-
Create the yaml file content for the OpenStack VirtualMachineImport object
apiVersion: migration.harvesterhci.io/v1beta1
kind: VirtualMachineImport
metadata:
  name: bios
  namespace: default
spec:
  virtualMachineName: "<instance name>" #Name or UUID for instance
  networkMapping:
  - sourceNetwork: "external"
    destinationNetwork: "default/vlan1"
  sourceCluster:
    name: microstack
    namespace: default
    kind: OpenstackSource
    apiVersion: migration.harvesterhci.io/v1beta1
- Wait for the vm-import-controller to start image transfer and create virtual machine
Expected Result
- Can import BIOS mode VM from VMware to Harvester
- The imported VM started in running state
- Check the config of imported VM
- In the
Advanced Optionspage, check only theBooting in EFI modeisnot selected
Verify Openstack EFI based VM migration using a custom storage class
- Access to Harvester dashboard
- Open the Storage Classes page
- Create a new storage class named
single-replica - Given “Number Of Replicas” value to
1 - We can use the existing
EFI modeOpenStack VM created before - Access to Harvester node and change to root
- Create the yaml file content for the VMware VirtualMachineImport object
- Given the storageClass value to
single-replica
apiVersion: migration.harvesterhci.io/v1beta1
kind: VirtualMachineImport
metadata:
  name: uefi-storage-class-test
  namespace: default
spec:
  virtualMachineName: "<instance name>" #Name or UUID for instance
  storageClass: single-replica
  networkMapping:
  - sourceNetwork: "external"
    destinationNetwork: "default/vlan1"
  sourceCluster:
    name: microstack
    namespace: default
    kind: OpenstackSource
    apiVersion: migration.harvesterhci.io/v1beta1
- Wait for the vm-import-controller to start image transfer and create virtual machine
Expected Result
- Can import EFI mode VM from VMware to Harvester
- The imported VM started in running state
- Check the imported VM
imageuse the specificsingle replicastorage class - Check the imported VM
volumeuse the specific “single replica” storage class