- Related issues: #2274 [Feature] VM Import/Migration
Category:
- Virtual Machine
Test Information
Test Environment:
- 1 node harvester on local kvm machine
- Harvester version: v1.1.0-rc1
- Vsphere: 7.0
- Openstack: Simulated using running devstack
- Download kubeconfig for harvester cluster
Environment Setup
- Prepare Harvester master node
- Prepare vsphere setup (or use existing setup)
- Prepare a devstack cluster (Openstack 16.2) (stable/train)
OpenStack Setup
- Prepare a baremetal or virtual machine to host the OpenStack service
- For automated installation on virtual machine, please refer to the
cloud init user datain https://github.com/harvester/tests/issues/522#issuecomment-1654646620 - For manual installation, we can also follow the command in the
cloud init user data
OpenStack troubleshooting
If you failed create volume with the following error message
Error: Failed to perform requested operation on instance "opensuse", the instance has an error status: Please try again later [Error: Build of instance 289d8c95-fd99-42a4-8eab-3a522e891463 aborted: Invalid input received: Invalid image identifier or unable to access requested image. (HTTP 400) (Request-ID: req-248baac7-a2de-4c51-9817-de653a548e3b)].
You can use these steps to configure OpenStack service
-
Check the certificate file exists
sudo cat /var/snap/microstack/common/etc/ssl/certs/cacert.pem -
Run the following command to configure microstack service
1. microstack init --auto --control --setup-loop-based-cinder-lvm-backend --loop-device-file-size 100 2. snap restart microstack.cinder-{uwsgi,scheduler,volume} 3. sed -i 's/client_max_body_size 0/client_max_body_size 4G/g' /var/snap/microstack/common/etc/nginx/snap/nginx.conf 4. snap restart microstack.nginx -
Check the cinder volume state
$ journalctl -xef -u snap.microstack.cinder-volume shows$ lvextend -r -l +100%FREE /dev/cinder-volumes/cinder-volumes-pool -
Set the ca certificate file
$ sudo tee /var/snap/microstack/common/etc/cinder/cinder.conf.d/glance.conf <<EOF [DEFAULT] glance_ca_certificates_file = /var/snap/microstack/common/etc/ssl/certs/cacert.pem EOF -
Restart the cinder service
sudo snap restart microstack.cinder-{uwsgi,scheduler,volume}sudo cat /var/snap/microstack/common/etc/cinder/cinder.conf.d/glance.conf
Verification Steps
Verify VmwareSource
- Define a secret for your vmware cluster
apiVersion: v1
kind: Secret
metadata:
  name: vsphere-credentials
  namespace: default
stringData:
  "username": "user"
  "password": "password"
- Define a VmwareSource Object
apiVersion: migration.harvesterhci.io/v1beta1
kind: VmwareSource
metadata:
  name: vcsim
  namespace: default
spec:
  endpoint: "https://vscim/sdk"
  dc: "DCO"
  credentials:
    name: vsphere-credentials
    namespace: default
The controller will try and list VM’s in the endpoint vmware cluster, and datacenter. If the details of credentials, endpoint and datacenter are correct, then the controller will mark the cluster as ready
$ kubectl get vmwaresource.migration
NAME      STATUS
vcsim   clusterReady
Verify OpenstackSource
-
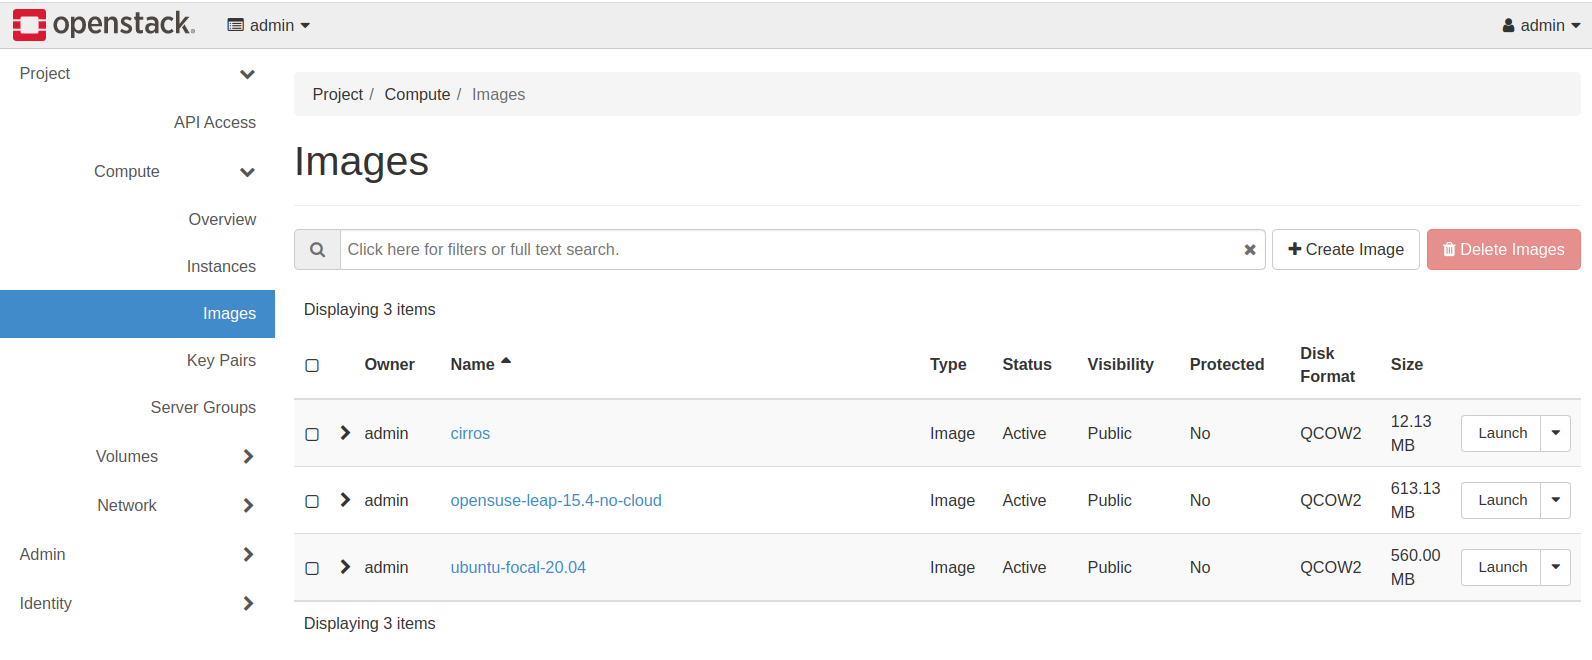
Access the Openstack dashboard
-
Create some images
-
Create key pairs
-
Create an empty volume to ensure the microstack.cinder services works well (if failed, check the OpenStack troubleshooting section)
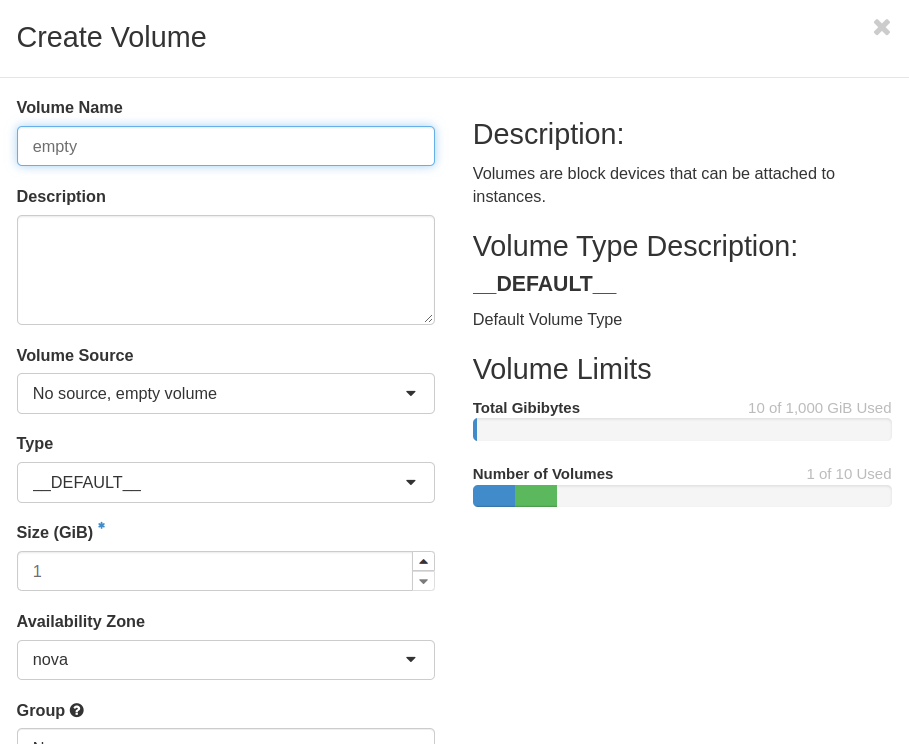
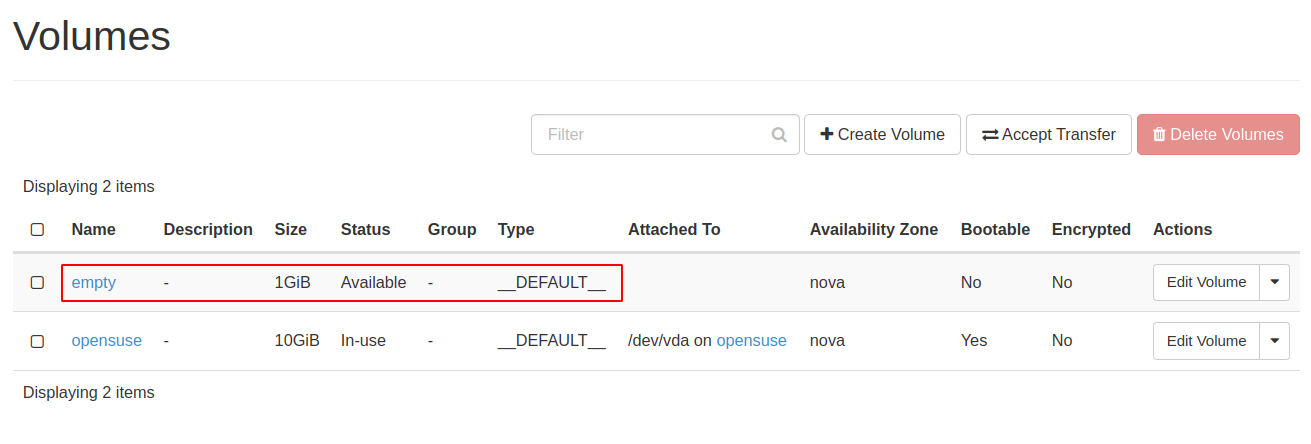
-
Launch a vm instance, ensure the vm can be created without error message
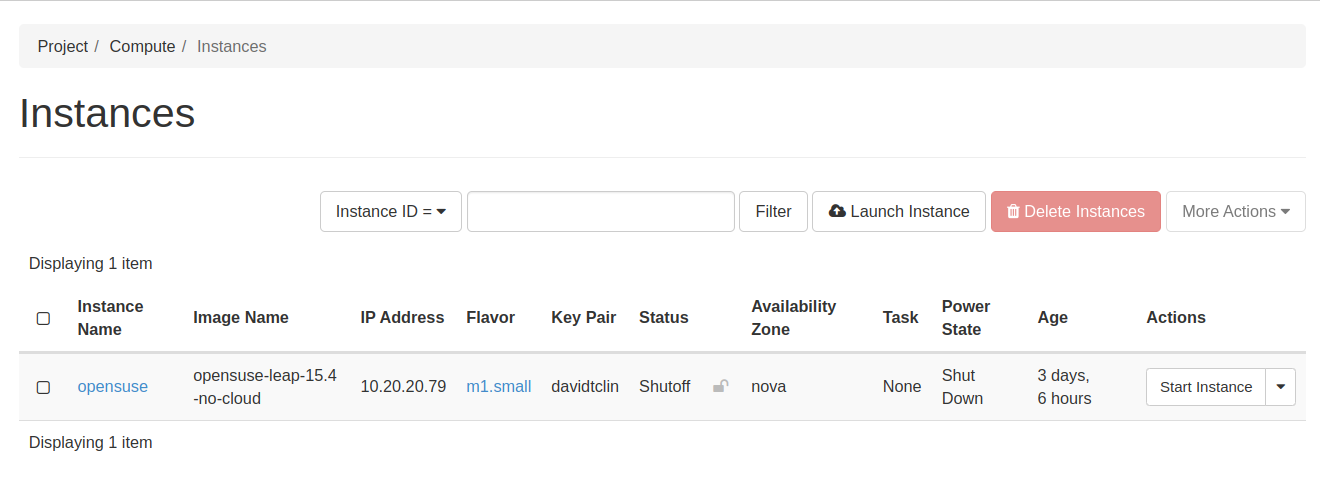
-
Enable the vm-import-controller addon on Harvester
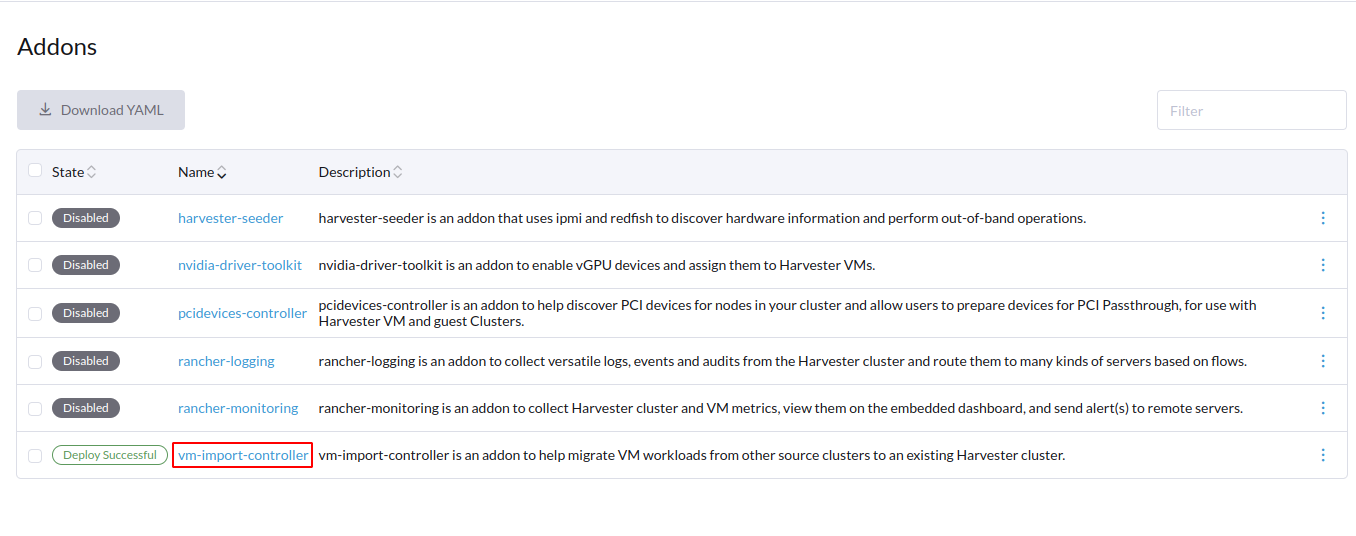
-
Open Compute -> System -> System Information page, find the
Servicestab -
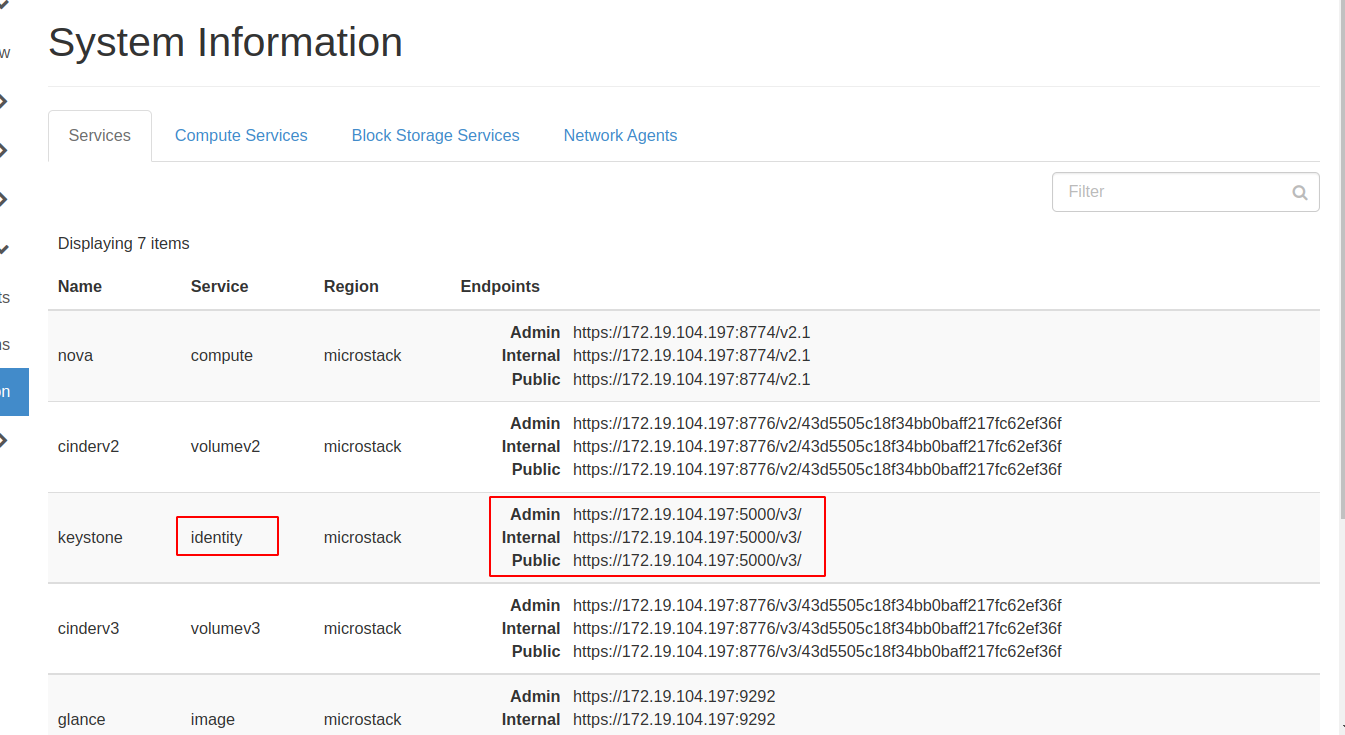
Check the
Regionin the page (eg.microstack)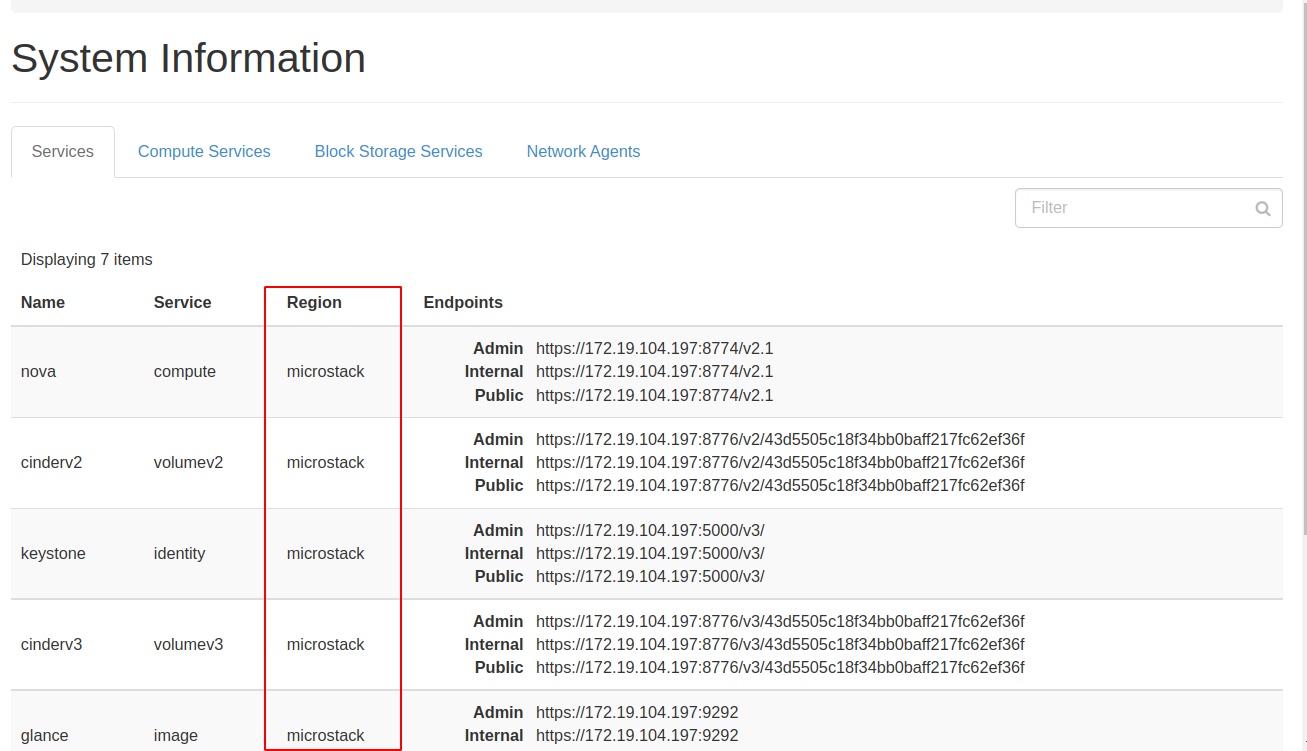
-
Check the endpoint of the identity item
-
Access the Harvester node machine
-
Define a secret for your Openstack cluster in yaml file and use
kubectlto create the crdapiVersion: v1 kind: Secret metadata: name: devstack-credentials namespace: default stringData: "username": "user" #dashboard username "password": "password" #dashboard password "project_name": "admin" "domain_name": "default" -
Define an OpenstackSource Object in yaml file and use
kubectlto create the crdapiVersion: migration.harvesterhci.io/v1beta1 kind: OpenstackSource metadata: name: devstack namespace: default spec: endpoint: "https://<dashboard ipv4>:5000/v3" region: "microstack" # value found in OpenStack dashboard credentials: name: devstack-credentials namespace: default
The controller will try and list the VM’s in the OpenstackSource project in the specified region, using the information from the credentials.
In this is successful the OpenstackSource will be marked as ready.
$ kubectl get openstacksource.migration
NAME       STATUS
devstack   clusterReady
VirtualMachine Import using VmwareSource
- A VM import can be triggered by the creation of a VirtualMachineImport object as follows:
apiVersion: migration.harvesterhci.io/v1beta1
kind: VirtualMachineImport
metadata:
  name: alpine-export-test
  namespace: default
spec:
  virtualMachineName: "alpine-export-test"
  networkMapping:
  - sourceNetwork: "dvSwitch 1"
    destinationNetwork: "default/vlan1"
  - sourceNetwork: "dvSwitch 2"
    destinationNetwork: "default/vlan2"
  sourceCluster:
    name: vcsim
    namespace: default
    kind: VmwareSource
    apiVersion: migration.harvesterhci.io/v1beta1
The controller will check that the source is ready, before the virtualmachine import is initiated.
In case the VmwareSource is not ready, then the object will be requeued until the VmwareSource becomes ready
If the VmwareSource is ready, then the VirtualMachine identified by the spec.virtualMachineName will be powered off
The VirtualMachine will be exported as an ovf, the disks will be convered to raw images.
The raw images are exported via http endpoint for the vm-import-controller service and used to define a Harvester VirtualMachineImage. Each disk is imported as a VirtualMachineImage in harvester
Once VirtualMachineImages are “Active” in harvester, a PVC claim will be created for each VirtualMachineImage.
The new PVC Claim is used to create a kubevirt VirtualMachine.
As part of the VirtualMachine creation, the CPU, memory specs from the original VM are copied to create the new VM.
All network interfaces, including their mac addresses are copied into network interfaces to kubevirt VirtualMachine object.
If the VirtualMachine network interfaces source network matches the list of networks available in spec.networkMapping then the new network interface is attached to the destinationNetwork.
If there is no networkMapping defined, or no matching sourceNetwork is found then the network interface in the original VM is attached to the Harvester Management Network.
Once the VM object is created, the VirtualMachine is powered on, and the controller waits for the VirtualMachine to be running
VirtualMachine Import using OpenstackSource
-
Create the
vlan1network on Harvester and ensure can reach the OpenStack dashboard -
A VM import can be triggered by the creation of a VirtualMachineImport object as follows:
apiVersion: migration.harvesterhci.io/v1beta1
kind: VirtualMachineImport
metadata:
  name: openstack-demo
  namespace: default
spec:
  virtualMachineName: "openstack-demo" #Name or UUID for instance
  networkMapping:
  - sourceNetwork: "shared"
    destinationNetwork: "default/vlan1"
  - sourceNetwork: "public"
    destinationNetwork: "default/vlan2"
  sourceCluster:
    name: devstack
    namespace: default
    kind: OpenstackSource
    apiVersion: migration.harvesterhci.io/v1beta1
Here is the example:
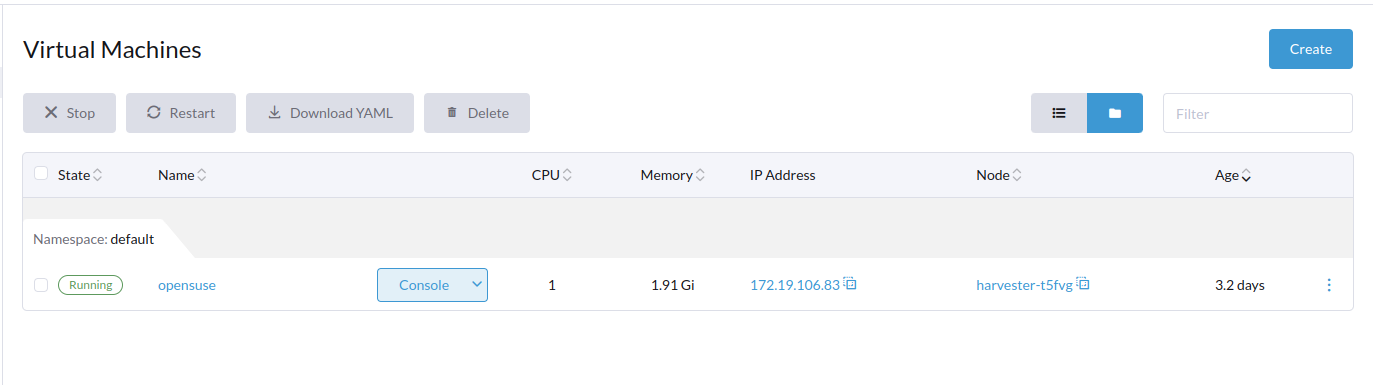
apiVersion: migration.harvesterhci.io/v1beta1 kind: VirtualMachineImport metadata: name: openstack-demo namespace: default spec: virtualMachineName: "opensuse" #Name or UUID for instance networkMapping: - sourceNetwork: "external" destinationNetwork: "default/vlan1" sourceCluster: name: microstack namespace: default kind: OpenstackSource apiVersion: migration.harvesterhci.io/v1beta1 -
After the
VirtualMachineImportcreated, you can find Harvester create a new image from the OpenStack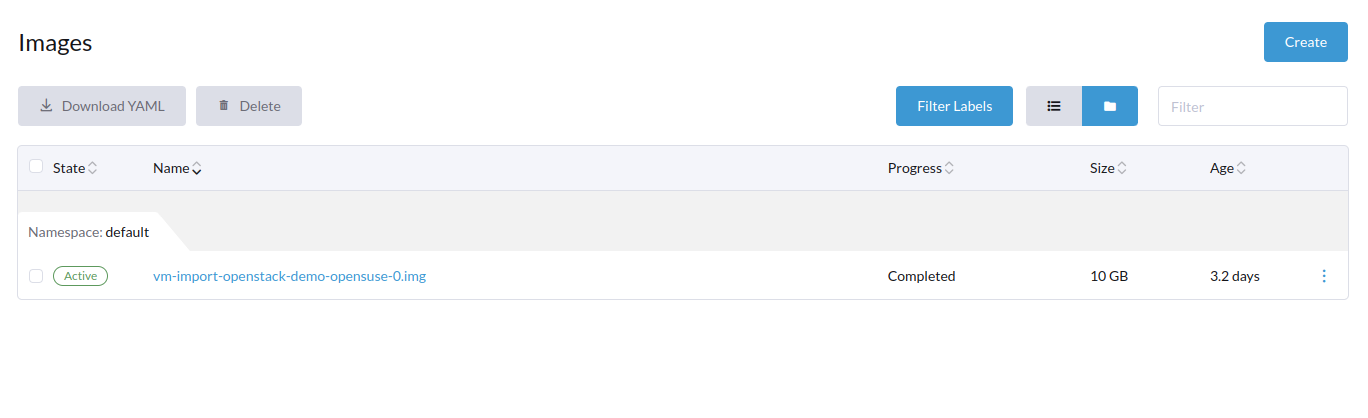
-
The OpenStack vm would be imported to Harvester
The controller will check that the source is ready, before the virtualmachine import is initiated.
In case the VmwareSource is not ready, then the object will be requeued until the VmwareSource becomes ready
If the VmwareSource is ready, then the VirtualMachine identified by the spec.virtualMachineName will be powered off
The VirtualMachine will be exported as an ovf, the disks will be convered to raw images.
The raw images are exported via http endpoint for the vm-import-controller service and used to define a Harvester VirtualMachineImage. Each disk is imported as a VirtualMachineImage in harvester
Once VirtualMachineImages are “Active” in harvester, a PVC claim will be created for each VirtualMachineImage.
The new PVC Claim is used to create a kubevirt VirtualMachine.
As part of the VirtualMachine creation, the CPU, memory specs from the original VM are copied to create the new VM.
All network interfaces, including their mac addresses are copied into network interfaces to kubevirt VirtualMachine object.
If the VirtualMachine network interfaces source network matches the list of networks available in spec.networkMapping then the new network interface is attached to the destinationNetwork.
If there is no networkMapping defined, or no matching sourceNetwork is found then the network interface in the original VM is attached to the Harvester Management Network.
Once the VM object is created, the VirtualMachine is powered on, and the controller waits for the VirtualMachine to be running
VirtualMachineImport states
When a VirtualMachineImport is completed the VirtualMachineImport job should be marked as virtualMachineRunning
NAME                    STATUS
alpine-export-test      virtualMachineRunning
openstack-cirros-test   virtualMachineRunning
-
At this point the imported VirtualMachine is running in harvester and the
VirtualMachineImportobject can be removed if needed. -
In case of a failed import, deletion of the
VirtualMachineImportobject will gc any VirtualMachineImages created as part of the import process.
Integration tests
Some core integrtion tests already exist with the vm-import-controller and are available under tests/integration
These test cases do however need access to a harvester, vmare and openstack cluster.
Users can run the vm-import-controller locally, with the following environment variables to trigger a VirtualMachineImports using VmwareSource and OpenstackSource
export GOVC_PASSWORD="vsphere-password"
export GOVC_USERNAME="vsphere-username"
export GOVC_URL="https://vcenter/sdk"
export GOVC_DATACENTER="vsphere-datacenter"
#The controller exposes the converted disks via a http endpoint and leverages the download capability of longhorn backing images
# the SVC address needs to be the address of node where integration tests are running and should be reachable from harvester cluster
export SVC_ADDRESS="address for node"
export VM_NAME="vmware-export-test-vm-name"
export USE_EXISTING_CLUSTER=true
export OS_AUTH_URL="openstack/identity" #Keystone endpoint
export OS_PROJECT_NAME="openstack-project-name"
export OS_USER_DOMAIN_NAME="openstack-user-domain"
export OS_USERNAME="openstack-username"
export OS_PASSWORD="openstack-password"
export OS_VM_NAME="openstack-export-test-vm-name"
export OS_REGION_NAME="openstack-region"
export KUBECONFIG="kubeconfig-for-harvester-cluster"
Expected Results
- VirtualMachines should be imported from Vmware / Openstack to Harvester cluster.
- Source VirtualMachines should be powered off
- VM Config and Data should be the same once imported
Current limitations
- In rc1 the vm-import-controller is using ephemeral storage, which is allocated from /var/lib/kubelet. This may limit the size of VM’s that can be imported.
Proposed Base tests
Note: Once VM Import is completed, the VM that was imported is no different than a regular Harvester VM. Testing the integration between the Importable sources and Harvester should be the focus
Note About Multi VM Selections:
- it’s good to try to import 3 different VMs as “multi” import with some mixed settings in each as:
- have at least 1 VM with more than 1 disks
- have at least 1 VM with more than 1 nics
- (OpenStack Only) have at least 1 VM with UUID & 1 VM with it’s “Name”
Test Multiple VM Import From OpenStack
- build multiple instances in OpenStack:
- create an image either in the GUI or with the CLI something like:
openstack image create --disk-format iso --public --container-format bare --file ./your_iso_location.iso - build a volume from that image in GUI or with CLI something like:
openstack volume create --image your_id_of_image_that_came_back_with_openstack_image_list --size 20 your_image_name - build the instance using the bootable image you built in the GUI or with something on the CLI like:
openstack server create --flavor 2 --volume your_volume_id_that_you_got_from_openstack_volume_list --network the_network_id_maybe_public_or_shared_you_got_from_openstack_network_list --user-data cloud-config-user-data-file.yaml --wait your-new-instance-name
- create an image either in the GUI or with the CLI something like:
- build a YAML containing multiple
kind: VirtualMachineImportresources:- build some VM(s) with
spec.VirtualMachineNamebeing UUID - build some VM(s) with
spec.VirtualMachineNamebeing the name of the VM
- build some VM(s) with
- bring up
k9sto navigate to the serviceharvester-harvester-vm-import-controllerin theharvester-systemnamespace, follow the logs (pending you’ve set up from earlier steps hooking in the OpenStack instance) - then apply the YAML you created for the multiple instances to the Harvester cluster
- validate that:
- volumes get built, representing the volumes tied to the openstack instances (same size)
- that the VMs in openstack get shutdown if they were powered on
- that the networking mapping is appropriate
- that images get built representing the volumes from the openstack vms
- that the vms in Harvester built from the vms in openstack get spun up and running (both in GUI and through K9s service logs &
kubectl get virtualmachineimport.migration) - validate that the vm can be accessed and the drives exist as they did in OpenStack
- validate that running the oposite command of
kubectl deletethe multiple resources YAML doesn’t remove the VMs, Volumes, and Images associated with the OpenStack import - validate that you can delete the VMs built and their Volumes clean up as well
(Negative) Test We Do Not Import VMs with no disks associated to them (OpenStack Only)
- Using OpenStack as the integration point:
- upload an image to OpenStack, something that has a live-cd / live aspect to it
- Utilize that image for launching an insstance either with the GUI in OpenStack or something like the CLI in:
openstack server create --image 2f7bca11-ab3f-452e-ac89-441efb715b6f --network cf9f7398-0c69-43b3-89fa-ad5ad8e2ccd9 --flavor 2 testK3osNoDiskGiven - Validate that the console comes up on OpenStack, that you can visibily see the VM in openstack running it’s live-installer / live, no disk attached other than the image
- Build a resource YAML for that vm
kind: VirtualMachineImport - Try to create the YAML / apply it to the Harvester cluster
- it should fail
Test Deleting VM but Not Image(s) And Recreate Works Openstack
- Remove the
VirtualMachineImportYAML from the clusterkubectl delete -f your_yaml.yaml - Remove the VM(s) & their disks/volumes
- Then create it again,
kubectl create -f your_yaml.yaml - Validate that the new image comes down (displayName will be the same), but should rebuild volume and start VM
TODO: The test env setup for the below test is difficult to do depending on how OpenStack was provisioned, we don’t currently have enough disk space alloted to the volume_group out in the test environment with DevStack
### Test VM Import From OpenStack With Large Disk On OpenStack
Follow same OpenStack Testing, just build an instance with a large volume 120GBWrite data to the disk something like:for((i=1;i<=100;i+=1)); do echo "on $i iteration building big files for disk filling test." && head -c 1G /dev/urandom > "$i_1GB_test_file_big_disk_fill_check_for_import.txt"; doneBuild aVirtualMachineImportitem for the VM and import it, validating all the other OpenStack validations
Test VM Import Quick Cancel (Prior to Image Download Finishing) in OpenStack
- Build a VM via VirtualMachineImport spec
- Create that CRD resource to the Harvester cluster
- Wait until the Download starts in the UI ( and you can also observe the:
kubectl get virtualmachineimage --all-namespaces -o wide) - As soon as the download starts (percentage beings to increase), remove the created YAML from the cluster with
kubectl delete -f vm_import_from_openstack.yaml - Validate that Image(s) is removed & no volumes, disks or vms were created
Test VM Import Respects Default Storage Class From OpenStack
Note: pre-req, you will need an additional storageclass set up, something that targets the node & disk by tag(s)
- Follow same OpenStack testing
- Deselect / reset default storage class
- Select a new storage class, set as default
- Import a VM, validate that all things brought accross (Volume(s), Image(s)) are on the default storage class you selected
Test Import VM from OpenStack into 3 node cluster
- Follow same OpenStack Testing
- Import VM to Multi-node cluster
- Validate VM
Test Import of VM With Bogus SourceNetwork On OpenStack
- Create a
VirtualMachineImport, but inspec.networkMapping[0].sourceNetworkprovide a name of a source network that does not exist - Import the VM to the cluster
- Validate the VM builds a network interface with:
- name:
pod-network - model:
virtio - network:
management Network - type:
masquerade
- name:
- Validate that the VM clears all the other typical checks
(Negative) Test VM With CamelCased Name Show Info & Error Message in deployments/vm-import-controller corresponding logs
- VM with
VirtualMachineImportthat hasspec.virtualMachineNamethat is camel-cased, does not import - Error in the log (deployments/vm-import-controller) of something like:
level=error msg="vm migration target testFocalCamelCase in VM focal-bad-name in namespace default is not RFC 1123 compliant" - Info msg in the log (deployments/vm-import-controller) of something like:
spec.virtualMachineName that is camel-cased, within the logs, we see: level=info msg="vm focal-bad-name in namespace default has an invalid spec"
!!WARNING!!
We only have a single instance of VMWare/vSphere that other teams use for “production” services/applications typically used for demos, though “not necessarily” mission-critical but still largely important.
Always “search” in vSphere to make sure there is only ever “one”/1 of the VM that you are trying to use for the import resource creation, as we need to be very careful for “what” VM(s) it is we are selecting, since it is a vSphere cluster for multi-team use.
Test Multiple VM Import From VMWare
- have multiple instances in vSphere
- create a .yaml that will encompass all of them
- validate that:
- volumes get built, representing the volumes tied to the openstack instances (same size)
- that the VMs in vSphere get shutdown if they were powered on
- that the networking mapping is appropriate
- that images get built representing the volumes from the vSphere vms
- that the vms in Harvester built from the vms in vSphere get spun up and running (both in GUI and through K9s service logs &
kubectl get virtualmachineimport.migration) - validate that the vm can be accessed and the drives exist as they did in vSphere
Test VM Import From VMWare w/ Powered Off VM Causes No VMWare Side-Effects in Tasks
- Validate same as regular VM Import from VMWare
- Additionally validate that within “Tasks” there are no tasks associated with the VM that are of “warning” / “operation failed” type
Test VM Import Respects Default Storage Class From vSphere/VMWare
Note: pre-req, you will need an additional storageclass set up, something that targets the node & disk by tag(s)
- Follow same VMWare/vSphere testing
- Deselect / reset default storage class
- select a new storage class, set as default
- import a VM, validate that all things brought accross (Volume(s), Image(s)) are on the default storage class you selected
Test Import VM from VMWare into 3 node cluster
- Follow same VMWare Testing
- Import VM to Multi-node cluster
- Validate VM
Test Import of VM With Bogus SourceNetwork On VMWare
- Create a
VirtualMachineImport, but inspec.networkMapping[0].sourceNetworkprovide a name of a source network that does not exist - Import the VM to the cluster
- Validate the VM builds a network interface with:
- name:
pod-network - model:
virtio - network:
management Network - type:
masquerade
- name:
- Validate that the VM clears all the other typical checks
Test VM Import Quick Cancel (Prior to Image Download Finishing) in vSphere
- Build a VM via VirtualMachineImport spec
- Create that CRD resource to the Harvester cluster
- Wait until the Download starts in the UI ( and you can also observe the:
kubectl get virtualmachineimage --all-namespaces -o wide) - As soon as the download starts (the percentage is increasing), remove the created YAML from the cluster with
kubectl delete -f vm_import_from_vsphere.yaml - Validate that Image(s) is removed & no volumes, disks or vms were created
Test VM Import Respects Default StorageClass For Harvester
- have a custom storageclass created and set as default
- create vm import
- validate volume(s) and image(s) created are using the default storage class